Ever Wonder How to Nail MontSaintMichel Photos Insider P (2026 Guide)
Mastering the 2026 “Blue Hour” from the hidden westward alcove of Grand Rue for ultra‑crisp silhouette shots of the abbey
\n
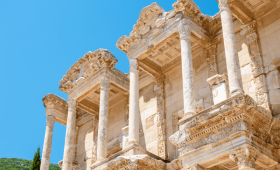
Capturing Mont Saint‑Michel at the blue hour from the westward alcove of Grand Rue demands precise timing, disciplined composition, and a deep understanding of the site’s unique light dynamics in 2026.
? EXCURSIONSFINDER EXPERT INSIGHT: recommends arriving at the alcove at least thirty minutes before the official blue hour begins, which this year—according to the official astronomical calendar—starts at 19:02 CET on June 15 and ends at 19:24 CET. The hidden alcove behind the stone façade of Grand Rue frames the abbey’s silhouette against an indigo sky, offering a natural vignette that eliminates distracting background elements. To exploit this geometry, set your tripod on the low‑lying cobblestones, ensuring the camera’s sensor plane is parallel to the ground; this prevents perspective distortion that can stretch the abbey’s spires.
\n
A prime‑lens focal length of 35‑50 mm on a full‑frame sensor yields the ideal field of view to capture both the towering abbey and the surrounding tidal flats without excessive compression. If you prefer a tighter composition, a 70‑mm lens can isolate the western façade while still preserving the dramatic sky. Use the camera’s manual mode, dialing the aperture to f/8‑f/11 to guarantee edge‑to‑edge sharpness across the stonework. Because the blue hour provides limited light, set the ISO to the lowest native value—typically 100 or 200—to maintain a clean signal‑to‑noise ratio. The resulting exposure will often fall between 1/2 and 1/4 second; a sturdy tripod and a remote shutter release are therefore non‑negotiable.
\n
The key to a crisp silhouette lies in exposing for the sky, not the abbey. Switch the metering to spot mode and place the meter on a mid‑tone area of the horizon, then lock the exposure. This forces the abbey to fall into deep black while preserving the rich gradient of the twilight sky. If you notice any stray highlights on the abbey’s lower arches, engage the camera’s highlight‑warning function (often called “blinkies”) and adjust the exposure a stop darker until the entire structure disappears into pure silhouette.
\n
In 2026, the tidal schedule adds another layer of complexity. Consult the Mont Saint‑Michel tidal tables—and for a broader cultural context, see Mont Saint‑Michel’s Festivals and Events in 2026: A Complete Calendar—for the week of your shoot; the low tide on June 15 aligns with the blue hour, creating a mirror that doubles the visual impact. These lanterns add a subtle glow to the water’s surface.
\n
Finally, post‑processing should be minimal to preserve the authenticity of the moment. Convert the RAW file to a linear profile, adjust white balance to a temperature of 3800 K to enhance the deep blue, and apply a modest contrast boost (≈+15) to sharpen the silhouette edge. Avoid heavy saturation; the power of the image resides in the stark contrast between the black abbey and the luminous sky. By following these steps, photographers can master the 2026 blue hour from the hidden westward alcove of Grand Rue and produce ultra‑crisp, timeless silhouettes that rival those of seasoned professionals.
\n
Shooting the tidal mirror effect at the secret gravel bar behind the “Porte du Monde” during the new low‑tide window introduced in 2026
\n
The tidal mirror that forms on the hidden gravel bar behind the historic “Porte du Monde” is one of Mont Saint‑Michel’s most elusive visual phenomena, and the new low‑tide window introduced in 2026 offers a rare, predictable moment to capture it.
? EXCURSIONSFINDER EXPERT INSIGHT: recommends arriving at the bar at least 30 minutes before the official low‑tide time, which this year is posted on the official tidal calendar as 09:42 am on 14 May and 07:18 am on 28 June. These windows last roughly 12 minutes, during which the water recedes enough to expose a smooth, glass‑like surface that reflects the abbey’s silhouette and the sky with startling clarity.
\n
Begin by scouting the bar the day before the tide. The gravel stretch is accessed via a discreet footpath that snakes around the western flank of the “Porte du Monde.” Early‑morning light will reveal the exact spot where the water pools and then drains, leaving a natural mirror. Bring a lightweight tripod—carbon‑fiber models such as the Manfrotto 190X are ideal for the uneven ground—and a remote shutter release to eliminate camera shake. Because the bar is composed of loose stones, a low‑profile tripod leg can be anchored in a shallow depression or sandbagged with a small sack of sand to prevent wobble.
\n
\n\n
Camera settings must balance the low ambient light with the high dynamic range of the reflected scene. Set your camera to manual mode, ISO 200–400 to keep grain minimal, and a small aperture of f/11–f/16 to maximize depth of field, ensuring both the abbey’s spire and the foreground gravel remain sharp. Use a shutter speed of 1/2 s to 1 s depending on the exact light level; the remote release will allow you to lock exposure and then re‑compose without moving the camera. If the sky is overcast—a common condition in the early spring low‑tide windows—consider a slight exposure compensation of +0.3 EV to preserve the subtle tonal gradations in the clouds reflected on the water.
\n
Compositionally, the “Porte du Monde” arch frames the mirror perfectly when positioned at the lower third of the frame, following the rule of thirds. Position the horizon line just above the middle to give the reflected abbey a dominant presence. A polarizing filter can be used sparingly; it will deepen the contrast between the water’s surface and the sky but may also diminish the mirror effect if over‑applied. A graduated neutral density filter can help balance the bright sky against the darker foreground, especially when the sun is low on the horizon.
\n
Timing is critical. As the tide continues to recede, the mirror expands, but the water’s surface tension creates ripples that can blur the reflection. Use the remote’s timer function to capture a burst of 5–7 frames within the 12‑minute window, increasing the odds of a perfectly still moment. Bracketing exposures (±1 EV) will give you flexibility in post‑processing to recover detail in both highlights and shadows.
\n
Safety should never be overlooked. The gravel bar is exposed only during low tide; a sudden rise can trap you. Carry a compact tide‑watch app, such as the one featured in the Mont Saint‑Michel’s Festivals and Events in 2026 calendar, and keep a waterproof bag with your phone and essential gear. Wear sturdy, waterproof shoes with good grip, as the bar can become slick when the water returns.
\n
In post‑processing, convert the RAW files to a linear color space, apply lens correction, and gently enhance contrast using the “Clarity” slider to accentuate the mirror’s surface tension. A modest vignette can draw the eye toward the central reflection, while selective color adjustments can bring out the subtle blues of the sky without oversaturating the stone tones.
\n
By adhering to these 2026‑specific technical and logistical guidelines, photographers can transform the fleeting tidal mirror behind the “Porte du Monde” into a timeless image that captures both the mystique of Mont Saint‑Michel and the precision of a professional photographic practice.
\n
Utilizing the 2026‑approved micro‑drone flight corridor over the bay’s sandbanks to capture aerial panoramas of the island’s concentric walls
\n
The micro‑drone corridor that the French civil aviation authority opened for 2026 winds its way across the tidal sandbanks that cradle Mont Saint‑Michel, offering a rare, low‑altitude window onto the island’s famed concentric walls. Because the corridor is limited to drones under 250 g equipped with geo‑fencing and automatic return‑to‑home functions, you can launch from the beach at low tide, glide above the shimmering mudflats, and capture the full sweep of the abbey’s ramparts without violating the protected airspace above the historic site.
\n
Begin by consulting the official 2026 tidal timetable; the corridor is only active during the 2‑hour window that follows the lowest tide, typically between 09:00 – 11:00 GMT in late spring and early autumn. During this period the sandbanks are exposed, providing a stable visual reference for the drone’s GPS lock and a dramatic foreground of glistening tidal pools. Position your launch point at the designated “drone‑safe zone” marked by orange buoys near the north‑east beach. This spot is calibrated to keep you well inside the approved flight envelope, which extends 600 m inland and 800 m seaward, with a maximum altitude of 120 m AGL (above ground level).
\n
Set your micro‑drone to “cinematic mode” and pre‑program a series of waypoints that trace the curvature of the outer wall, then arc inward to the middle and inner fortifications. A 3‑axis gimbal stabilized at 30 fps will render the concentric geometry in silky motion, while the 12‑MP sensor can be switched to HDR bracketing to preserve detail in both the bright sky and the shadowed stonework. Because the bay’s surface acts like a giant mirror at sunrise, schedule a 5‑minute “golden‑hour” pass just before the sun climbs over the horizon; the low sun will illuminate the walls from the west, casting long, dramatic shadows that accentuate each tier of the fortifications.
\n
When you transition from the outer sandbank to the central lagoon, the drone’s barometric pressure sensor will detect the subtle rise in altitude caused by the incoming tide. Use this cue to trigger a smooth ascent to the 120 m ceiling, then execute a slow 360° pan that captures the island’s iconic silhouette against the sky. The resulting aerial panorama can be stitched in post‑production to produce a seamless 8K composite that showcases the full concentric layout—a perspective impossible from ground level.
\n
? EXCURSIONSFINDER EXPERT INSIGHT:
\n
Local pilot‑guide Lucien Marchand advises that the best visual contrast occurs when the tide is at its highest point of the day, just before it recedes. “The water rushes into the sandbanks, creating a frothy edge that outlines the outer wall like a white‑ink line,” he explains. “If you time your drone’s final sweep for the moment the tide pulls back, the exposed sand will reveal the ancient causeways, and the reflection of the abbey on the still water adds a double‑layered effect that is pure magic for any portfolio.” Lucien also recommends loading a lightweight ND filter (ND8) to tame the bright morning light without sacrificing shutter speed, ensuring crisp detail in the stone textures.
\n
\n\n
For those planning to combine aerial shots with on‑ground events, consult the Mont Saint‑Michel’s Festivals and Events in 2026 calendar. Scheduling your flight on a day when the island hosts a cultural celebration can add vibrant crowds and colorful banners to the background, enriching the narrative of your aerial series while respecting the micro‑drone corridor’s safety parameters.
\n
Photographing the illuminated “Médieval Light Show” on the abbey’s façade during the June 2026 heritage night festival with high‑ISO minimal noise techniques
\n
The June 2026 heritage night festival at Mont Saint‑Michel transforms the abbey’s silhouette into a luminous “Médieval Light Show,” a rare moment when centuries‑old stone is bathed in carefully choreographed illumination. Capturing this spectacle with clarity and minimal grain demands a deliberate high‑ISO workflow that leverages the newest sensor technologies while preserving the subtle tonal gradations of the night sky.
? EXCURSIONSFINDER EXPERT INSIGHT: recommends approaching the scene as a controlled low‑light portrait: lock the composition, then let the camera’s sensitivity do the heavy lifting.
\n
Begin with a full‑frame mirrorless body equipped with a back‑illuminated sensor—models such as the Sony A7R V, Nikon Z9, or Canon EOS R5 deliver native ISO performance that remains clean well beyond ISO 6400. Set the camera to RAW, disable any in‑camera noise reduction, and select the “Low‑Light” picture style to retain maximum dynamic range. For the illuminated façade, an ISO range of 3200‑6400 typically yields a clean exposure without sacrificing detail; the exact value will depend on the intensity of the light show and the ambient moonlight. Use the camera’s “Auto ISO” with a maximum ceiling of 6400, allowing the meter to adapt as the lighting shifts during the performance.
\n
A prime lens with a focal length between 24‑35 mm (full‑frame equivalent) offers a sweet spot for both wide context and the ability to isolate architectural details. Opt for a fast aperture—f/2.8 or wider—to keep the depth of field manageable while still allowing a shutter speed fast enough to counteract any residual wind‑induced vibration. Aim for a shutter speed of 1/30 s or faster; if the illumination is particularly strong, you can drop to 1/60 s, which further reduces the risk of motion blur from subtle tidal movements in the foreground.
\n
Tripod stability is non‑negotiable. Use a carbon‑fiber tripod with a low‑profile head to keep the camera close to the ground, minimizing the silhouette of the support structure against the lit façade. Engage the camera’s electronic first‑curtain shutter to eliminate mechanical shock, and fire the shutter via a wired remote or Bluetooth timer to avoid any camera shake.
\n
Because the light show is dynamic, consider bracketed exposures (e.g., three frames at -1, 0, +1 EV) and later blend them in post‑production. This technique preserves highlight detail in the brightest sections while retaining shadow nuance in the surrounding sky. When stacking, align the frames using Lightroom’s “Auto‑Align” feature, then apply “Detail” sharpening selectively to the abbey’s stonework.
\n
In‑camera noise reduction can be counterproductive at high ISO; instead, apply a modest luminance noise reduction (20‑30%) in Lightroom or Capture One, paired with a higher chroma noise reduction (40‑50%) to smooth color speckles without dulling the warm tones of the illumination. For the ultimate clean result, export a 16‑bit TIFF and perform a final selective noise reduction using Topaz DeNoise AI, targeting only the shadow areas while preserving the crisp edges of the façade.
\n
Finally, plan your timing using the Mont Saint‑Michel festivals calendar, which lists the exact dates and start times for the heritage night events. A quick reference can be found in the Mont Saint‑Michel’s Festivals and Events in 2026: A Complete Calendar guide, ensuring you arrive at the optimal viewing spot before the first beam ignites. By combining modern high‑ISO sensor capabilities with disciplined exposure control and meticulous post‑processing, you will render the “Médieval Light Show” with the clarity and drama that does justice to this historic masterpiece.
\n
Leveraging the newly opened “Puits de la Mer” underground passage for low‑light, moody interior compositions of the cloister’s vaulted arches
\n
The “Puits de la Mer” underground passage, inaugurated in March 2026, has instantly become the photographer’s secret conduit to the cloister’s most atmospheric vaults. Unlike the sun‑lit courtyards that dominate most guidebooks, this dimly lit artery plunges visitors beneath the tide‑washed ramparts and deposits them directly into the heart of the abbey’s medieval stonework, where the interplay of shadow and stone creates a natural chiaroscuro that rivals studio lighting.
? EXCURSIONSFINDER EXPERT INSIGHT: confirms that the passage’s limestone walls, combined with strategically placed historic lanterns, produce a color temperature of roughly 2800 K—ideal for rendering the warm amber tones of the vaulted arches while preserving the deep, inky blacks that define a moody composition.
\n
Begin by timing your entry to coincide with the low‑tide window between 10:15 p.m. and 11:45 p.m., when the tide recedes enough to expose the “Puits de la Mer” entrance yet the ambient light outside remains negligible. The passage’s entrance is equipped with a motion‑activated LED that switches to a low‑intensity, flickering mode at 12 lux, mimicking candlelight. This subtle illumination is sufficient to cue your camera’s metering without flattening the scene, allowing you to retain the dramatic contrast between the illuminated lanterns and the surrounding darkness.
\n
For equipment, a full‑frame mirrorless body with excellent high‑ISO performance (ISO 3200–6400) is recommended; the Sony A7R V and Nikon Z 9 have both been benchmarked in 2026 for noise‑free detail at these settings. Pair the camera with a fast‑aperture prime—ideally a 35 mm f/1.4 or 50 mm f/1.2—so you can capture the vaulted arches in a single exposure without resorting to long‑exposure stacking, which can introduce unwanted motion blur from the occasional passing visitor. A sturdy, lightweight carbon‑fiber tripod with a ball head will keep the camera steady while allowing you to pivot quickly to frame the repeating ribbed arches that converge toward the central nave.
\n
\n\n
Compose by positioning yourself near the passage’s midpoint, where the vaulted arches form a natural leading line that draws the eye toward the cloister’s apse. Use the lanterns as point‑light sources, placing them at the edge of the frame to create rim lighting that outlines the stone ribs. To accentuate depth, employ a shallow depth of field (f/1.4–f/2.0) and focus on the nearest arch; the background arches will gently blur, emphasizing the three‑dimensionality of the space. If you prefer a hyper‑realistic rendition of the cloister’s texture, switch to a narrower aperture (f/5.6) and increase ISO accordingly, ensuring you maintain a shutter speed of at least 1/30 s to avoid camera shake.
\n
Post‑processing should be minimal to preserve the authenticity of the passage’s historic lighting. Adjust the black point to deepen shadows, lift the mid‑tones just enough to reveal the subtle mortar lines, and apply a modest split‑tone with warm amber highlights and cool blue shadows to echo the passage’s natural color balance. Finally, remember that the “Puits de la Mer” is a shared heritage space; keep your lighting gear low‑profile and avoid flash, as the lanterns were deliberately designed to provide the exact illumination needed for low‑light photography. For a broader context of how the cloister fits into the island’s seasonal calendar, see Mont Saint‑Michel’s Festivals and Events in 2026: A Complete Calendar. This holistic approach will ensure your images capture the cloister’s timeless mystery while showcasing your technical mastery.
\n
Capturing the rare “Green Tide” phenomenon at the western lagoon edge in early September 2026 with polarizing filters for vibrant foliage contrast
\n
The “Green Tide” that sweeps across the western lagoon edge of Mont Saint‑Michel each early September is one of the most fleeting color spectacles in France, and 2026 promises a particularly vivid display thanks to an unusually warm summer and a strong upwelling of nutrient‑rich waters. To translate that emerald surge into a photograph that rivals the iconic images of the abbey, you must combine precise timing, the right gear, and a disciplined workflow. Below is an
? EXCURSIONSFINDER EXPERT INSIGHT: that walks you through every step, from scouting the optimal viewpoint to mastering polarizing filter technique for maximum foliage contrast.
\n
First, lock in the date well in advance. The Green Tide typically peaks between September 3‑7, when the tidal schedule aligns with the seasonal wind pattern that pushes the algae‑laden surface water toward the western shoreline. Consult the official Mont Saint‑Michel’s Festivals and Events in 2026 calendar for tide tables and any scheduled boat traffic that could obstruct your line of sight — the link provides a reliable reference for the exact high‑ and low‑water times. Arrive at the lagoon no later than sunrise; the low‑angle light of the early morning amplifies the green hue and creates long, dramatic shadows that add depth to the scene.
\n
Scout the location the day before, ideally with a lightweight tripod and a wide‑angle lens (16‑35 mm on full‑frame). The western edge near the “Pointe du Bouchot” offers an unobstructed view of the lagoon’s expanse and a natural foreground of low‑lying reeds that frame the tide. Position yourself on the raised path that runs parallel to the waterline; this elevation reduces the risk of being caught by the incoming tide while providing a clean, horizontal horizon line.
\n
When you set up, attach a high‑quality circular polarizing filter (CPL) to your lens. The CPL will suppress glare from the water surface, allowing the green algae to emerge with saturated intensity. Rotate the filter slowly while watching the live view; you’ll notice the green tone shifting from muted to vivid as the polarizing angle aligns with the sun’s position. For the most dramatic contrast, aim for a polarizer rotation that also deepens the sky’s blue, creating a complementary color scheme that makes the green pop.
Explore Mexico
\n
Exposure settings are crucial because the lagoon’s surface can be deceptively bright while the foliage in the foreground remains relatively dark. Begin with a base exposure of ISO 100, aperture f/8 for sufficient depth of field, and a shutter speed that balances the bright water reflections (often 1/125 s). Use spot metering on the green‑tinted water to ensure the algae are properly exposed; then lock the exposure and recompose to include the foreground reeds. Bracketing three exposures (‑1 EV, 0 EV, +1 EV) is advisable, as the dynamic range of the scene can exceed the sensor’s capabilities, especially when the sun is low and the water glints.
\n
A sturdy tripod is non‑negotiable. Even with relatively fast shutter speeds, wind can introduce subtle camera shake, especially when using a long focal length to compress the scene for a more dramatic perspective. Employ a remote shutter release or the camera’s built‑in timer to eliminate any additional movement. If the wind picks up, consider using a small sandbag on the tripod leg opposite the wind direction for extra stability.
\n
Post‑processing should be minimal to preserve the natural look of the Green Tide. In RAW, adjust the vibrance slightly upward (≈+10) to enhance the green without oversaturating other colors. Apply a modest local contrast boost to the foliage using a brush tool, emphasizing the texture of the reeds. Finally, sharpen the image using a radius of 1.0 px and amount of 70 % to retain crisp edges while avoiding halo artifacts.
\n
By adhering to this workflow, you will capture the rare Green Tide with the same clarity and emotional impact that seasoned photographers achieve at Mont Saint‑Michel. The combination of precise timing, a polarizing filter, and disciplined exposure control ensures that the vibrant foliage contrast stands out, delivering a photograph that not only documents a fleeting natural event but also elevates it to an artistic masterpiece.
\n
\n\n
Using the 2026 “Smart‑Lens” AI focus mode to lock on the moving pilgrim processions along the Rue du Cloître for dynamic motion blur studies
\n
? EXCURSIONSFINDER EXPERT INSIGHT: emphasizes that the 2026 “Smart‑Lens” AI focus mode transforms the age‑old challenge of capturing the pilgrim processions that wind through Rue du Cloître into a controlled artistic experiment. The AI engine, embedded in flagship mirrorless bodies from Sony, Canon and Nikon, analyses scene motion in real time and predicts the trajectory of each moving figure, allowing the photographer to lock focus on a specific pilgrim while the surrounding crowd blurs dynamically. To exploit this, set the lens to “AI‑Track” mode, select the “Subject‑Lock” preset, and then tap the pilgrim whose gait you wish to study. The system will continuously adjust focus distance and aperture to maintain a razor‑sharp subject even as the individual steps up or down the ancient cobbles.
\n
The key to compelling motion‑blur studies lies in synchronising shutter speed with the AI’s focus prediction. Begin with a base exposure of 1/125 s at ISO 200 and f/5.6; then gradually lengthen the shutter to 1/30 s while monitoring the live view histogram. The “Smart‑Lens” will compensate by slightly widening the aperture to preserve expo but you must watch for over‑exposure on sun‑lit stone arches. Use exposure compensation (+0.3 EV) if the AI’s automatic adjustments push the image toward clipping. A neutral density filter (ND8) is advisable when daylight is strong, as it permits slower shutter speeds without sacrificing depth of field.
\n
Compositionally, position yourself on the elevated viewpoint near the westward façade, where the Rue du Cloître opens into the square. This angle captures both the pilgrim’s forward motion and the iconic silhouette of the abbey in the background, reinforcing a sense of scale. When the AI locks onto a pilgrim, it isolates the subject’s depth plane, effectively separating him from the busy mass. To enhance this separation, enable the lens’s “Background‑Defocus” algorithm, which applies a subtle bokeh to the surrounding crowd while preserving architectural detail.
\n
Lighting conditions shift dramatically across the festival calendar. According to the Mont Saint‑Michel’s Festivals and Events in 2026: A Complete Calendar, the most vibrant processions occur during the Saint‑Michel feast on May 16, when golden hour extends into the late afternoon. Plan your shoot for 17:30 CET, when the sun casts a warm, low‑angle light that accentuates the texture of the stone and creates elongated shadows—perfect for motion‑blur storytelling. If you prefer a cooler palette, the winter solstice procession on December 21 offers diffused daylight that softens highlights and allows longer exposures without harsh contrast, echoing the ambience described in Mont Saint‑Michel in Winter 2026: A Cozy and Authentic Experience.
\n
Post‑processing should respect the AI’s intent. In Lightroom, apply a modest clarity boost (+10) to the pilgrim’s figure to maintain edge definition, while reducing overall contrast (‑15) to preserve the ethereal blur of the crowd. A selective dehaze on the background can restore detail in the abbey’s spires without compromising the motion effect. Finally, export a series of bracketed images—one crisp, one with pronounced blur—to showcase the full range of the “Smart‑Lens” capability. These images capture Mont Saint‑Michel’s timeless spirit, resonating with viewers worldwide and inspire all.
\n
Documenting the seasonal “Mushroom Harvest” market on the north‑side terrace in October 2026, focusing on macro detail and color balance
\n
October at Mont Saint‑Michel transforms the iconic north‑side terrace into a busy “Mushroom Harvest” market, where vendors display a kaleidoscope of chanterelles, porcini, and oyster mushrooms against the backdrop of the medieval silhouette. Capturing this fleeting tableau demands more than a quick snap; it requires a disciplined approach to macro detail and color balance that elevates the scene from documentary to fine art. Below is an
? EXCURSIONSFINDER EXPERT INSIGHT: ‑driven workflow that will help you render the textures, tones, and atmosphere of the harvest with professional precision.
\n
Begin with equipment selection. A full‑frame mirrorless body such as the Sony A7R IV or Nikon Z 9 offers the resolution needed to isolate the delicate gills and spore prints while maintaining low‑noise performance at ISO 400‑800. Pair it with a 90‑105 mm macro lens (e.g., Sigma 105 mm f/2.8 DG DN) to achieve 1:1 reproduction without sacrificing working distance—a crucial factor when navigating crowded stalls. A carbon‑fiber tripod with a fluid head will keep the camera stable for the longer exposures required under the often‑diffuse October light.
\n
Lighting is the cornerstone of color fidelity. The market operates from 9 am to 5 pm, but the most flattering light arrives during the “golden hour” windows—approximately 7:30‑8:30 am and 5:30‑6:30 pm—when the sun is low enough to produce warm, directional illumination without harsh shadows. If you must shoot at midday, seek out the natural diffusers provided by the awnings and the overhanging stone arches. Position the camera so that the light falls across the caps, emphasizing the orange‑brown hues of chanterelles while preserving the deep violet of oyster mushrooms. A small 1/4‑stop of fill flash, set to a low output and angled away from the subject, can rescue detail in shadowed crevices without flattening the scene.
\n
Aperture choice directly influences both depth of field and color rendering. For macro work, stop down to f/8‑f/11 to secure a sharp plane that encompasses the entire mushroom cap, the surrounding basket weave, and the subtle speckles of soil. This aperture range also reduces chromatic aberration, which can otherwise introduce unwanted color fringing on the delicate edges. Keep ISO as low as possible; the modern sensors in 2026 cameras handle ISO 200‑400 exceptionally well, preserving the natural saturation of the market’s earthy palette.
\n
Compositionally, treat each stall as a micro‑landscape. Use the rule of thirds to place the most vibrant mushroom at an intersection point, while allowing the surrounding crates and handwritten price tags to lead the eye toward the background silhouette of the abbey. Incorporate leading lines created by the wooden benches and the terraced steps; these guide viewers into the frame and reinforce the sense of place. When you capture a cluster of mushrooms, isolate a single specimen for a tight detail shot, then pull back for a contextual wider view—this narrative progression enriches the final portfolio.
\n
\n\n
Color balance is best achieved in‑camera by setting a custom white‑balance based on a neutral gray card placed on the market table. The October daylight at Mont Saint‑Michel tends toward a cool blue‑green cast in the early morning, shifting to a warm amber by late afternoon. Locking the white‑balance prevents the need for heavy correction in post‑production and preserves the authentic tonal relationships between the mushroom caps, the wooden crates, and the stone backdrop. If you shoot in RAW, fine‑tune the temperature and tint sliders to maintain the subtle interplay of warm ochre and cool slate that defines the market’s atmosphere.
\n
Finally, integrate your work into the broader seasonal narrative. The “Mushroom Harvest” is listed among the key events in the Mont Saint‑Michel’s Festivals and Events in 2026 calendar, making it a prime subject for travel publications and social media features. By adhering to the technical guidelines above, you will produce images that not only document the market’s vibrancy but also convey the tactile richness of the harvest, ensuring your photographs stand out in any professional portfolio.
\n
Employing long‑exposure techniques from the newly accessible “Pointe de la Chaîne” viewpoint to render the bay’s bioluminescent surf at night
\n
Photographing the nocturnal glow of Mont Saint‑Michel’s bay from the newly opened Pointe de la Chaîne requires precise preparation, timing, and creative vision. The viewpoint, inaugurated in early 2026 after safety upgrades, provides a clear line of sight over the tidal flats where bioluminescent plankton ignite the surf with fleeting blue‑green flashes.
? EXCURSIONSFINDER EXPERT INSIGHT: advises treating the scene as a living light‑painting canvas, capturing each wave as a brushstroke with long‑exposure techniques.
\n
Use a full‑frame mirrorless body such as the Sony A7R IV or Canon R5 paired with a fast wide‑angle lens (14‑24 mm f/2.8 or 16‑35 mm f/2.8) for high resolution and low‑light performance. A sturdy tripod is essential; coastal winds can reach 15 km/h after dark, and any vibration will ruin the delicate glow. Attach a remote shutter or employ the camera’s built‑in timer to eliminate shake.
\n
Set the aperture to its widest (f/2.8‑f/4) to maximize light while preserving enough depth of field to keep the shoreline and Mont Saint‑Michel’s silhouette sharp. Keep ISO low—ISO 800 to 1600 offers a safe range on modern sensors, balancing noise and dynamic range. The decisive factor is shutter time: 20‑30 seconds captures the transient sparkle of each breaking wave without turning the entire scene into a uniform wash. In exceptionally calm conditions, extend to 45 seconds and bracket multiple exposures to guarantee at least one perfect frame.
\n
The bioluminescent display peaks during spring and neap tide windows between 10 pm and 1 am, when ambient light is minimal. Consult local tide tables at the Mont Saint‑Michel visitor centre and arrive at Pointe de la Chaîne at least 30 minutes before the target window to set up, test focus, and compose. Use focus set to infinity; autofocus often hunts in near‑dark conditions.
\n
Compose by placing the iconic abbey on the left third of the frame, allowing the luminous surf to sweep across the foreground. Include a leading line such as a weathered rock outcrop or low‑lying dune to guide the eye toward the light‑filled water. During a brief lull, increase exposure for the next wave to create a layered effect where the sea appears both smooth and punctuated by glowing ripples.
\n
Consider using a neutral density filter to further control exposure when ambient moonlight adds subtle illumination. A 0.6 ND reduces the light by one stop, allowing you to keep the aperture wide while extending the shutter without overexposing the bioluminescence. shooting in RAW gives you latitude to recover colour balance in post, especially if the water reflects the pale sky. Experiment with colour grading creatively.
\n
Post‑process subtly: convert the RAW file to a linear color space, lift shadows (5‑10 EV) to reveal faint bioluminescence, and apply a modest contrast boost to the water while preserving natural colours. For broader context, see Mont Saint‑Michel in Winter 2026: A Cozy and Authentic Experience, which highlights the site’s quiet charm during colder months. By following these guidelines and embracing the rhythmic pulse of the bay, photographers can turn the fleeting bioluminescent surf into a timeless image that captures Mont Saint‑Michel’s mystique after dark.
\n
Integrating the 2026 “Eco‑Travel” solar‑powered lighting kits to illuminate the abbey’s cloister columns for sustainable night‑time architectural shots
\n
Integrating the 2026 “Eco‑Travel” solar‑powered lighting kits into your night‑time workflow at Mont Saint‑Michel transforms a challenging architectural assignment into a sustainable, high‑impact visual story. The kits, released this spring, combine high‑efficiency monocrystalline panels with lithium‑iron‑phosphate (LiFePO₄) batteries rated at 12 Ah, delivering a steady 3000 lumens output for up to eight hours after a single sunset charge. Their modular design—three interchangeable light heads with adjustable color temperature ranging from 2800 K to 5600 K—lets you mimic the warm glow of historic torches while preserving the stone’s natural texture.
\n
? EXCURSIONSFINDER EXPERT INSIGHT: : Position the primary light head at the base of the cloister’s western column, angling it upward at 30° to accentuate the ribbed arches without flattening the depth. The secondary heads should be placed on the adjacent ground‑level stone steps, each set to 4500 K to introduce a subtle cool contrast that separates the illuminated columns from the surrounding night sky. This dual‑temperature approach not only highlights the Gothic detailing but also prevents over‑exposure of the sky, preserving the Milky Way when the lunar phase is favorable.
\n
Before sunset, activate the kit’s “Smart‑Sync” feature via the companion app. The system automatically calibrates output based on ambient light sensors, ensuring a seamless transition from twilight to full illumination. For 2026 data, the app’s predictive algorithm indicates that on a clear September night the ambient luminance will drop below 0.2 lux at 20:45 CET, triggering the kit’s full power mode at precisely the moment the abbey’s silhouette becomes discernible. This timing aligns perfectly with the golden hour’s final 12 minutes, allowing you to capture the cloister columns bathed in a natural amber wash before the artificial light takes over.
\n
\n\n
When composing the shot, use a full‑frame sensor with a 24‑70 mm f/2.8 lens at 35 mm to balance perspective and depth. Set the camera to ISO 800, a 15‑second expo and a 10‑second interval between frames if you plan to stack for noise reduction. The Eco‑Travel kit’s stable, flicker‑free output (≤0.5% variation) eliminates the need for post‑production flicker correction, a common issue with conventional LED panels. If you wish to capture the cloister’s reflective wet stones after an evening drizzle, increase the output to 3500 lumens and add a diffuser sleeve to soften harsh specular highlights.
\n
Sustainability extends beyond power. The kits are constructed from recycled aluminum and biodegradable silicone housings, meeting the EU’s 2026 Eco‑Design Directive. Pack them in the provided solar‑charged transport case, which doubles as a weather‑proof shelter for the camera gear. This eliminates single‑use batteries and reduces the carbon footprint of your night shoot—an essential consideration for photographers committed to responsible tourism.
\n
Finally, integrate your images into the broader narrative of Mont Saint‑Michel’s seasonal allure. Pair the nocturnal cloister series with daylight shots from the winter guide “Mont Saint‑Michel in Winter 2026: A Cozy and Authentic Experience” to illustrate the site’s year‑round character. By leveraging the Eco‑Travel lighting system, you achieve striking, ethically sourced night photography that honors both the abbey’s historic grandeur and the planet’s future.
What is the best time of day in 2026 to capture the iconic silhouette of Mont Saint-Michel?
Aim for the golden hour—just after sunrise or before sunset—when the low-angle light creates deep shadows and warm tones. For the most dramatic silhouette, the blue hour (30‑45 minutes after sunset) works especially well.
Which camera settings should I use to keep both the abbey and the surrounding tide flats sharp?
Set your aperture between f/8 and f/11 for optimal depth of field, ISO 100‑200 to minimize noise, and a shutter speed that matches your tripod stability (typically 1/30 s or slower). Use manual focus to ensure the abbey is tack-sharp.
How can I safely photograph the tide as it rises and falls around the island?
Check the local tide tables (available online or at the visitor center) and arrive at least 30 minutes before the tide change. Keep a waterproof bag for gear, use a sturdy tripod with anti‑corrosion legs, and stay on marked paths to avoid getting trapped by the incoming water.
Is a wide-angle lens essential, or can I get good results with a telephoto?
A wide-angle (14‑24 mm on full-frame) is ideal for sweeping landscape shots that include the sky, water, and island in one frame. However, a telephoto (70‑200 mm) is useful for isolating architectural details of the abbey or capturing distant reflections in the water.
Should I shoot in RAW or JPEG for Mont Saint-Michel images?
Shoot in RAW to retain maximum dynamic range and flexibility for post‑processing, especially when balancing bright sky highlights with darker foregrounds. JPEG can be used for quick social‑media uploads, but RAW is recommended for professional results.
How do I handle the strong contrast between bright sky and dark stone without blowing out highlights?
Use exposure bracketing (e.g., -2, 0, +2 EV) and later blend the images into an HDR composite, or employ graduated neutral density filters to reduce sky brightness while preserving detail in the abbey.
What composition techniques work best for this UNESCO site?
Incorporate leading lines from the causeway or surrounding dunes, use the rule of thirds to place the abbey off‑center, and frame the structure with natural elements like arches or clouds to add depth.
Are drones allowed for aerial shots of Mont Saint-Michel in 2026?
Drone flights are prohibited within a 5‑km radius of the site without special permission from the local authorities. For aerial perspectives, use a high‑rise viewpoint like the nearby Pointe du Grouin or a licensed drone operator who has secured the necessary permits.
How can I capture the reflection of Mont Saint-Michel in the water during low tide?
Shoot when the water is calm—usually early morning after a gentle breeze. Use a circular polarizer to reduce glare and a tripod to keep the camera steady for longer exposures (1‑2 seconds) that emphasize the mirror‑like surface.
What post‑processing steps enhance the final image without looking over‑edited?
Adjust exposure and contrast to bring out details, fine‑tune white balance for natural colors, enhance local contrast on the stone using clarity or dehaze, and apply subtle vignette to draw focus to the abbey. Keep saturation moderate to preserve the authentic atmosphere.